Shimmery Fun

Hero Arts has a monthly challenge that I wanted to participate in. It’s rare I have time to create, but I made some time today.

Their challenge is to use heat embossing.

I wanted something that changed as you tip it in the light. It also needed some movement, cause I want the fun.

Shimmering Fun

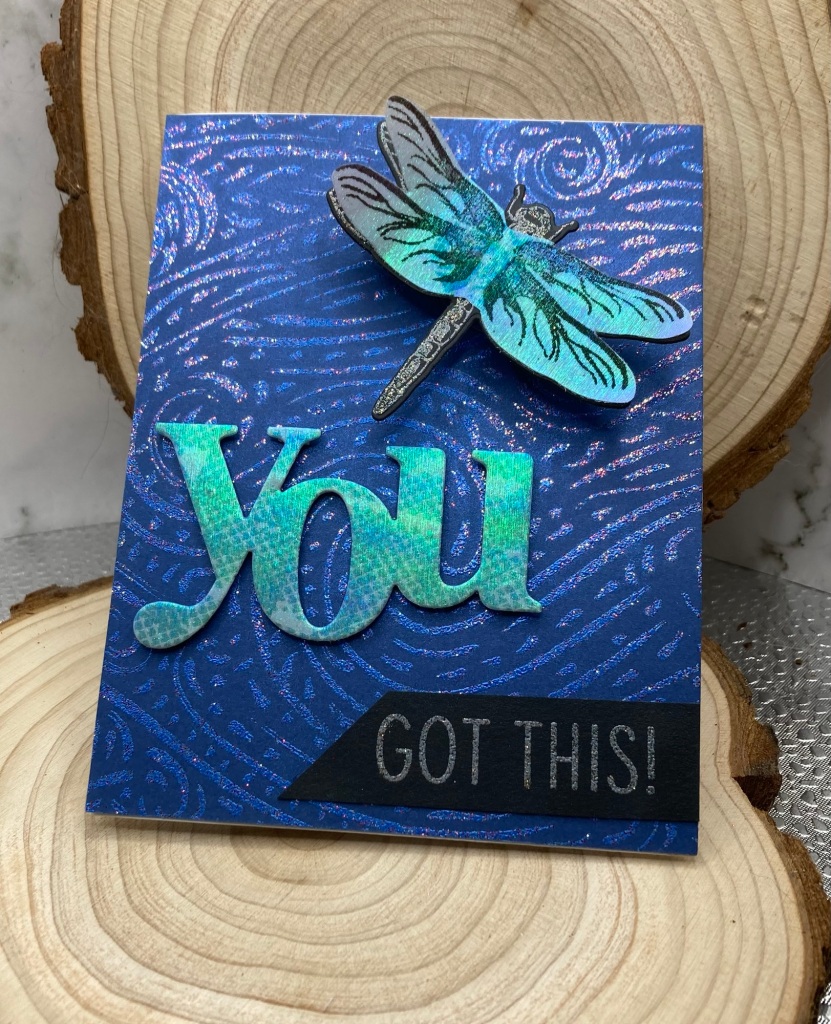
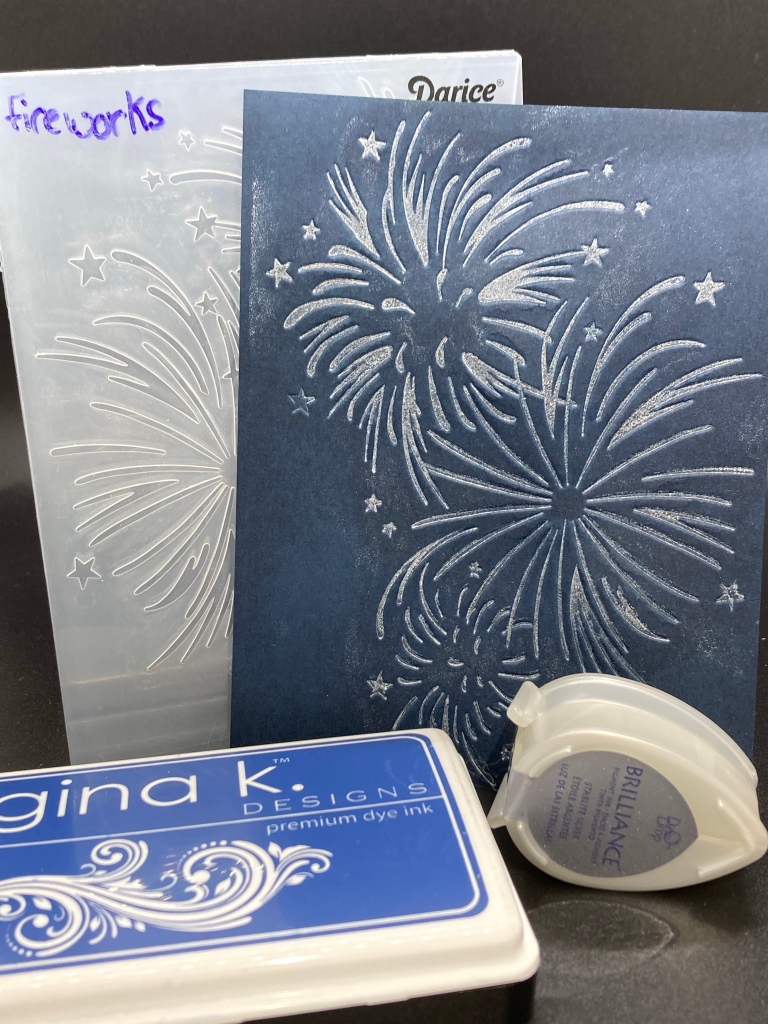
I started off with a blue piece of card and used Hero Art’s CG720 Starry Night Brushstroke Bold Print with some Versamark ink and Sparkle N Sprinkle Americana embossing powder. The background reflects different colors as you tip it in the light.

Then I used some blue/green reflective flower wrap to get even more shimmery goodness. It’s plasticy, so couldn’t emboss on it. I adhered some to black card and cut the “you” from the HA DC281 Love You Stamp & Cut set. I used a sentiment from the set to heat emboss on a piece of black card with some straight shimmer embossing powder (Bridal by Ranger?). Also used the HA CM326 Color Layering Dragonfly to stamp the outline image on black card and emboss with the same shimmer EP. Used one of the wing images to stamp on the shimmer paper with black VersaFine ink (pigment as it’s a slick surface).

Used liquid glue to adhere the black piece of the sentiment, some foam tape to adhere the “you”, and a wobble behind the dragonfly so that moves.

Had a lot of fun making this card. The blue panel was adhered to a nice, sturdy, white card base.

I hope you can see at least a bit of the shimmer and imagine the fun.

Thank you for spending some of your valuable time with me today.

Move It Move It

I had so much fun creating this card for an upcoming birthday. The set is a Pink & Main set and I used som MFT stencils.

The Viking and his ship swing side to side and it’s inside an infinity shaker.

It makes me smile and I hope it does you, as well.

Viking shaker

Thank you for spending some of your valuable time with me today. Have an excellent rest of your week.

Folds over Folds

I’ve never participated in the Cardz 4 Galz challenge, but as I just made this one it’s getting entered in their challenge of more than 1 fold.

http://cardz4galz.blogspot.com/2023/06/202-more-than-one-fold.html?m=1

Multiple Folds

The left side folds in first, right side folds over that, then the top folds down. The idea is from far outer space working closer to earth with each fold.

Star envelope to house this space card.

Thank you for sharing some of your valuable time with me today.

Trying It

I watched a video by one of the current prolific card creators. I know she’s a salesperson for whatever the newest release is, but it actually looked impressive. So, I tried the technique with the product I own. (I don’t have a ton of spare $ for crafting supplies.)

The technique was to use metallic pigment ink on the raised surface of a 3D embossing folder and press it into the image. Sounds simple enough, but none of the metallic pigment inks I’ve used have been all that impressive. I can generally see straight through them.

Gold and Yellow

I started with a 3D embossing folder (Simon Says Stamp) and gold pigment ink with another yellow on top.

You can see the shine if you tip it in bright light.

Bronze and Yellow

Next I tried bronze pigment ink. This one shows more detail, but you only get the shine in bright light

Distress Ink and Yellow

Third try was using Distress ink in Walnut Stain. As Distress Ink is a hybrid ink it stays wet longer than dye ink, but not as long as pigment ink.

This one shows the details pretty well and worked easily. However, no shine as it isn’t a metallic.

After those I decided to try a regular embossing folder with metallic pigment ink on a dark card stock.

Silver and Blue

For the first I used a silver pigment ink on very dark blue card with blue ink over the top. It turned out pretty well. I did get a bunch of ink on the surface, as I was using a dewdrop ink pad. Wiping it away with either my finger or a shammy did not work well. I had hoped the ink over the top would cover it a bit more, but the metallic ink shows through.

Platinum and Blue

Next I tried using platinum metallic and a darker blue ink over the top. It turned out pretty well, but I had the same issue wiping away the extra ink.

Both of these have shine in bright light.

Delicate White and Blue

Lastly I used white metallic pigment ink. The Delicata ink barely showed up and didn’t have much shine, even in bright light.

When trying to upgrade that one, it looks pretty bad. I set it aside to look at another day.

Here are the cards I made with these.

Silver and Blue
Platinum and Blue
Gold and Yellow
Bronze and Yellow
Distress and Yellow

Had fun making the cards. But, unless you have the right pigment ink and in a large pad size, you probably won’t wind up with an image like the prolific card creator got. It will still be pretty and you’ll probably have a great time making cards. Both types of embossing folder worked, but you obviously get more detail with a 3D one.

Thank you for spending some of your valuable time with me today. Have a wonderful rest of your weekend.

Being Christ-like

bible.com/bible/1588/1pe.2.20-21.AMP

This is not what we think of when we talk about being called by God. We tend to look past the present into our future. We absolutely have a hope and a future that is beyond all the good we can imagine. But first, we live here in the world and grow and become more like HIM. It’s rough. That’s also why we’re told to encourage and build up the family of God we’re a part of. We were never meant to go through life alone. We have GOD first, and our brothers and sisters in Christ, too.

I needed 1 Peter 2 this morning. God always has the right words at the right time.

This is not my typical post, but it is who I am. If you read this far, I am praying for you.

Pictures

I generally don’t have more than a bit of time here and there to create, so taking time to share what I’ve made rarely happens. So, I’m just going to share a bunch of pictures of what I’ve made in the past few months.

Stencil Class
Stencil Class
Stencil Class
Stencil Class

I made a bunch for the Online Card Classes Stenciled 2 class. I won’t show all of them. You can tell I enjoyed using my dragonfly stencil.

Stencil Class
Stencil Class
Stencil Class
Stencil Class
Stencil Class
We Craft Cards Discord challenge
Cleaning off my table
More cleaning
New stencil set and an idea

Had an idea when I saw this stencil set, so I played. Oh, I needed that play time. As this stencil set is new, I’m entering it in the As You See It Challenge #298.

http://www.asyouseeitchallenge.com/2023/05/298.html

We Craft Cards Discord challenge
Having fun
Similar, but different

Part of this was cleaning up as I moved things around in my room.

Most of it was the Stenciled 2 class. Had fun with that.

Have an excellent day. Thank you for sharing some of your valuable time with me.

Cuddly Christmas

I checked out MFT’s challenges a couple days ago. It’s the first time I’ve looked in quite a while. Decided I wanted to use an adorable set a friend gave me and enter a couple of their challenges.

Here’s what I made:

I used MFT’s Cute & Cuddly Christmas, Coral Flair background, and Whimsical Woodgrain background. I used Kraft, Jelly Bean Green and a brown.

Thanks for spending some of your valuable time with me. Have a great rest of your weekend.

It’s been too long

It has been a long time since I’ve posted anything. That’s the problem with having too many things going to have time. I’ve been creating, just in spare moments here and there.

Had fun creating this card today and wanted to share it with you.

The background was done quite awhile ago using a gel plate, stencil, and paint. Embossed it with a detail embossing folder (SSS) I thought was amazing and perfect to go with my tiny little image. Image and sentiment are from an MFT set called Odd Couple.

The challenge at the We Craft Cards Discord this week is 1980s, off the movie “Honey, I Shrunk the Kids” to use tiny images or inchies.

Thank you for spending some of your valuable time with me!

Christmas 9

I was trying to catch up today as this week is another busy one. And, I’m not quite done with Christmas cards for this year.

Todays homework was just to use snowflakes. Ha! Most of the foiling I did was snowflakes, so I was ready.

You can see the foil on these. Did the original foiling, then used what was left for the other. Frustrating part of the card on the right was wanting to surround my piece with silver glitter washi tape. It had to be glued down. Good grief! Anyway, I like how they turned out.

Thank you for spending some of your valuable time with me today.