“O” for Origami

We are on day 2 of the L O V E crop at We Craft Cards.com.  If you aren’t a member, come join us!  As the title says, Day 2 is “O”, which is for origami.

The challenge for today is to do some tea bag folding and make a fun Hearts & Flowers fold.  You need 4 small squares of thin paper (easier to fold if it’s thin).  It doesn’t matter what size, as long as they aren’t too big.  You want the finished piece to fit on either a card, or page.

2-7-19 Origami 1

Now, work with 1 square at a time.  So, take your square and flip it over so the back side is up.  Now, fold it in half.  Unfold that fold and fold that same section down to the half fold line.  Leave that folded in place and fold it in half the other direction.

2-7-19 Origami 2

Unfold that sideways fold and flip the whole piece over.  (That top 1/4 fold down is still folded down and is at the top of your piece.)

Now, fold the top 2 corners down along the center line.

2-7-19 Origami 3

Fold that top point down backwards a little more than the halfway point.  (I folded it to the bottom.)

2-7-19 Origami 4

The above photo shows the fold from both sides.

Your piece should look like the one on the right.  Now, take those small squares that are the front of the paper and push them down to make points.  See the picture below on the left.

2-7-19 Origami 5

Now, fold the small white corners down and in.  Picture above on the right.  Then, fold the very top points down and towards you (just a tiny bit).  You also need to fold those side pieces in to the center fold.

2-7-19 Origami 6

Top left shows the front without the points folded down.  Top rights shows the top of the points folded down.

2-7-19 Origami 7

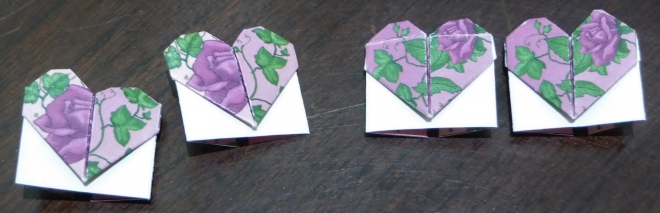
Here are all 4 pieces done.  Now, you can put glue on the bottom right, white corner, then slide the next piece, lower left white corner onto that and work your way around.

2-7-19 Origami 9

The finished piece.

Depending upon how big those starting squares were, determines how large your finished piece is.

I made 2 of these and here’s what I did with them:

2-7-19 O Example 2

Made one more and did something a little more classy, if that’s more your style.

2-7-19 O Example

Come join us at the crop.  If you join the forum, let me know what name and email you used and I’ll have the administrator get you approved.

Thanks for spending some of your valuable time with me today!

Octagon Star Frame

For those of you that wonder at my posts appearing at 12:01am, I am not up that late, or that early, but I love having it there when people get up, so I schedule it.

This fold is fun to do, and makes something a bit different.

To start, you will need 8 squares of paper.  (I used 1-7/8″ squares, but any size will do depending on how large you want your finished project.)  You will also need a piece of card stock.

Flip your square over so the back side is up.  Then fold diagonally in half, so the left point touches the right point and crease, then unfold.  Next, fold from top to bottom, so the top point touches the bottom and crease, then unfold.

You should now have a crease going horizontally point to point and vertically point to point.  Take one side of the top and fold the side down along the center crease.  Do the same to the other side and unfold.

Do the same thing with the bottom two sides and unfold.

Now, to do the next step, I put my index fingers on the side points and use my thumbs and third fingers to fold the tops and bottoms back along the center lines (where you just folded).  You have to pull your index finger up and out-of-the-way as you are doing this, but you want those center pieces sticking up.  You want to fold the bottom point up to meet the top point.  As you begin folding it up, those center pieces will start to move out toward the sides.  When the bottom point is laying on top of the top point, crease along the center again.  Depending on how “square” your squares were, you may need to re-crease the small side triangles so they lay flat.  (I find that even though I use the markings on my paper-cutter, sometimes my squares aren’t perfect.  It’s okay.  Most of the time you really can’t tell on the finished project.  Just have an extra square or two in case one is too far off.)

Putting this together is the most difficult part.  Because the pieces do not attach to each other, you need some card stock or paper to adhere them to.  I used a rectangle piece of card stock, then had to trim it down a bit at the end.  (Not easy with the pieces are already adhered.)  You can start with a rectangle with sides that are 1/2 the length of one of your squares (for a 2″ square, you will have each side of your octagon 1″).  Or, you could make it larger than your finished piece, or even adhere to a square.  Put a bit of adhesive on the back, bottom edge of your first piece, then adhere it to your card stock or paper.  I lined my piece parallel to the edge of my card.  The top, bottom and each side should be square to each other.  So, I laid down my angle piece, to figure out approximately where my side piece should be, then attached that side piece parallel to the side of the card.  Then adhered the angle piece and worked my way around.  Each corner touches.

At this point, you could trim out the center area and around the outside, if you don’t want any of that background piece showing.  This works well as a frame around a picture, or with a sentiment or image centered in it.

Trying to punch my corners after all my pieces were adhered, was not easy, but it was possible to do.  This is just a fun way to highlight something.  Try it and see what you think.  As you can tell, each piece folds up some, so it has depth to it, but can fold flat.  The white card base is A2 size (4-1/4 x 5-1/2), and I used 1-7/8″ squares, which wound up being too large for my card base.  I will either hand deliver this one or make my own envelope to fit it.

Thanks for spending some time with me today!

Shining Star

It’s always nice to create something cute.  Here is a cute star that is simple enough to make.  All you need are 8 squares of paper (1-7/8″ is normal sized, but it works larger and smaller, too), a bit of adhesive and a bone folder helps, but isn’t required.

Start with one of your squares right side up and fold in half horizontally.  Have it so the fold is on the right and the open edges on the left (you can switch it later, but my instructions are going this way).


Fold the top left corner back so the top edge lays along the fold.  Then fold that little flap in half, so its edge is along it’s fold.

(My picture on the right is flipped upside down, but the point closest to the open edges is the point and the bottom edge folds up along the fold line.)


Next you want to unfold that and flip it the other direction, so it folds under.

Now, flip your piece from left to right, so the open edges are on the right and the fold on the left with your folded corner still at the top of the piece, but on the table.

Do the same fold you just did on the other side with the top left corner on the bottom right corner.


Now you do the same thing with your other 7 pieces.


To attach the pieces together, you will have them all so the open edges are on the left with the folded corner at the top (flip them back over).

You will slide the unfolded layer up under the folded layer of the piece on the left and continue around.  The trickiest part of this is making sure the bottom corners (on the back) are sliding together, too.


Put a bit of adhesive under the unfolded section you are sliding under the fold to hold it together.

The star on the left is with the 1-7/8″ squares and the one on the right used 1″ squares.

Shining Star Instructions

Thanks for spending some time with me today!

Double Star Teabag Fold

The Double Star Teabag Fold or Kaleidoscope Origami is quick and easy to make, but really pretty.  I know I’ve posted this one before, but thought you might enjoy it again in a pretty pink.

You will need 8 squares of paper for this.  I used 1-7/8″ squares, though you could use any size depending upon how large you want your finished piece to be.  My finished piece is 2-5/8″ diagonally across.

Begin with the white, or wrong side of one of your squares up.  You want to fold the piece in half diagonally, then unfold it.  Now, with your square aligned like a diamond and the diagonal fold running up and down the center, fold the lower right edge up along that center fold.  Do the same with the lower left edge.

Now, the point at the top that is a single layer, fold down along the top of the folded pieces and unfold.  After that is complete, fold those top two edges down along the center line.

Fold the top point down along the fold line that you made earlier.  Then flip your piece over from left to right and fold the bottom point up so it is even with the two side points.

Do the same with the other seven pieces.  To adhere them together, you will put a small drop of glue on the lower left point and then slide that into the left side of that small folded up point.


Do the same all the way around.  Remember to lift the very first one up to slide it into the last piece.

Here is the front of the finished Double Star:

And the back:

You can use either side and each gives you a very different look.  If you had any trouble following along with my instructions, please watch the video below.

Thanks for spending some time with me today!

Star Flower Fold

Here is another teabag fold or kaleidoscope origami pattern for you.  This one is called a Star Flower.

You will need eight 1-7/8″ squares (as long as they are square any size is probably fine) and a bone folder is helpful for this one, but not absolutely necessary.


You will want to start with the white or back side of the square up.  Fold in half diagonally, then unfold and fold in half the other diagonal direction and unfold.  You should now have the white side up with a cross going from corner to corner.


Fold each corner in to the center.  You will wind up with a square.


Fold in half backward along one diagonal (flaps will be on the outside).  You will have a triangle.  Now, fold that triangle in half.  The folded corner should be at the top and the open corner at the bottom.


You will want to pull open the top section.  As you open it, the bottom corner will start to go up to meet the top point.  Now, fold that flat.  You then want to fold the top corner of just the top layer down to the bottom point.  Unfold that.  The crease you just made will help with the next step.


The next step is to fold that top section you just folded down into a rectangle.  To do that, you will pull open the front part of it.  The bone folder helps with this, then pull open the other side while keeping the first side open.  This isn’t easy, but it is possible.  Fold this flat along the center crease you made before.  It should now look like the second image down on the right side of this picture.  Take your piece and flip it over from right to left.  The angled side should be from top center down to left point.  Take the right bottom point and fold it up along the center line.  Now fold the bottom left point up to the top center point along the center line.  It sounds confusing, but you can get it.  If you are really confused, watch the video below.


The point that you just folded up, you need to fold in half towards the inside.  I fold it to the bottom point on the outside, then fold it in.  Your first piece is now complete.  Do the same with the other seven pieces.

To attach the pieces, you will put a bit of adhesive on the top of the small section that is left at the bottom left and tuck that behind the piece you just folded.  Do that all the way around and attach the first piece under the fold on the last piece.  You now have a beautiful piece to use however you want.  Here is the finished Star Flower again.


If the words were confusing, try watching the video to see what I did.

Thanks for spending some time with me today!

Closed 8 Point Star Fold

Here is a new teabag fold for you.  This one is the Closed 8 Point Star.

To start, you will need 4 squares.  For this one I used 2″ squares.  Now, cut each square in half diagonally, so you will wind up with 8 triangles.

You want to lay each triangle with the long side straight across the top.  Then, fold it in half from left to right, so the long side has a fold in the center.  Then, open it back up.  Make sure the right side is up.

Take one side and fold the side point down to the center point.  Repeat on the other side.

Now, the open point with the two folded over points should be at the bottom with the fold at the top.  Take one of those points and fold it to the side, lining up the edges.  Repeat on the opposite side.

Then, flip the piece over so the back side is up.

The single point should be at the bottom with the fold at the top.  (See the top right image.)  Now, fold the edge on the right up along the center fold line.  Then, do the same on the left side.  Flip your piece over and turn it so the folded edges are at the bottom with the long point at the top.

Do the same for all 8 pieces.  To adhere the pieces, put a bit of adhesive on the right side, towards the bottom.  Line the left folded edge along the center line.  Attach each piece in the same manner.  Before attaching the last piece, put a bit of adhesive in the same place on it, so the first piece will adhere to the top of it.

Here is your final piece:  The back is pretty impressive, too: The fun part about this star is that instead of adhering the pieces in this manner, you can flip the pieces and put the long points together in the center.  As you don’t have anything to adhere them to on the next piece, you will have to have a small circle or something to adhere the points to.  It makes for another interesting looking fold.

Try it and see what you think!

Thanks for spending some time with me today!

Square Crossed Star

Here is another teabag fold called Star Squares.  It looks like one square on top of another, but turned.  It sounds confusing, so here’s a picture to help you out.

This one takes eight 1-7/8″ squares of patterned paper and a bit of adhesive.


Start with the white side of one square up and fold diagonally, then unfold.  Now, fold it the other diagonal and unfold.  When you open it up you should have an “X” folded in your square.


Now, fold the bottom to the top and unfold, then side to side and unfold.

You should see an “X” and a cross folded into your square.


Fold your square into a triangle with the fold on top and the point down.

Gently take on of the sides along the fold, open it slightly and push that crease so it goes down and into the center.  Do the same with the other side.  You should now have a diamond with the opening at the bottom.

Take the top flap on the left and fold it down along the center crease.  Fold the top flap on the right and fold it down along the center crease.  Piece one is done!  Now, do the same with the other seven pieces.

To adhere the pieces together, put a little adhesive on the left side of the center section and slide the flat side area of the next piece on top, so the center point (with all the folds) is to the center.  Add all pieces.  On the last piece, you will have to put some adhesive on top of the right side and lift the left side of the first piece up into place.

Are you impressed?  You just made a fun Teabag Fold, or Kaleidoscope Origami.  If you had any problems, watch the video below.

Thanks for spending some time with me today!

Teabag Fold: Four Directions Star

It has been quite a while since I’ve shared a new teabag fold with you, so here is a new one, the Four Directions Star.

You only need 4 squares of paper for this one.  As long as they are square, any size will do, though for mine I used 1-7/8″ squares.

Take your first square and flip it over to the white side.

Then you want to fold it in half and unfold it.

Now take the bottom half and fold it to that center fold line.

Repeat with the top half.  Unfold both.

Take the top left corner and fold it down along the top fold line.

Fold the bottom right corner up to the bottom fold line.

Now, fold the top section down along the previously made fold line.

Take the top right corner (folded over now) and fold it down to the bottom fold line.

Fold the bottom edge up along the bottom fold line.

Fold the bottom left corner (folded over) and fold it up so the side edge is even with the top and the bottom edge is straight up and down along the center.

One piece done!  Fold the other 3 the same way.

Take the right point on each piece and that will be what you are lining up.  The first piece, keep laying horizontal and put some adhesive along the center, but slightly to the left.  Put the point of the next piece at the top along the center (to the left side of the center).  Put the third piece in the same position, but along the second piece.  The fourth piece will go in the same position on the third piece (it will be going down towards you, now).  Put the fourth piece on top of the third piece, but under the first piece.  It sounds confusing, but is quite simple if you watch the video below.

Thanks for spending some time with me today!